Tag Archives: DIY Project Tutorials

DIY – Using an ELF Compact as a Travel Eyeshadow Palette

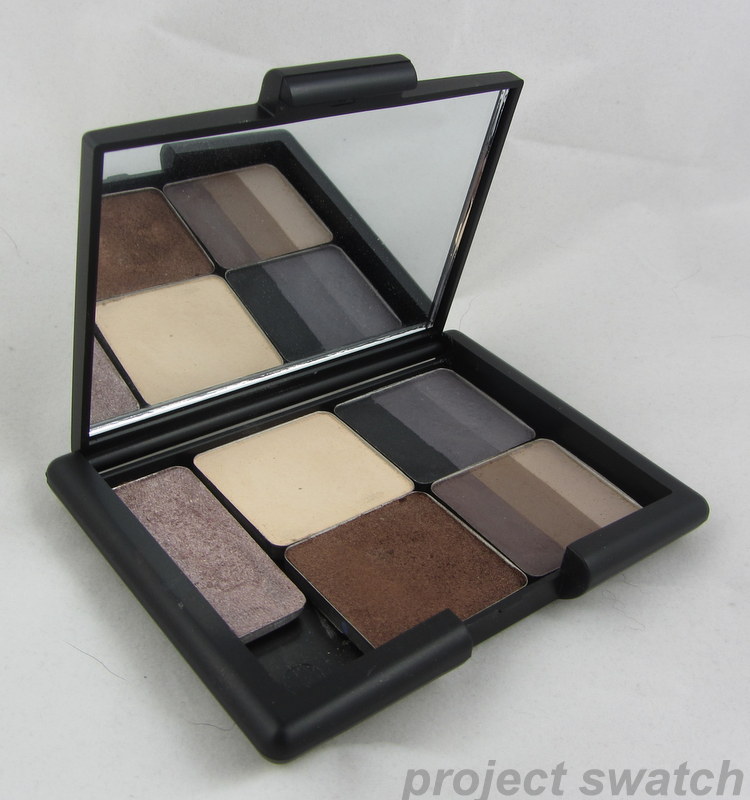
DIY Freestyle compact – with 4 Inglot shadows and one WnW


I’ve recently had good luck with several ELF products, but I do find the brand hit-or-miss. However, even when I have a miss with a product in a compact, I’ve figured out a way to repurpose the compact that makes it worth the $1.50 to $3 that I paid!

Take this translucent mattifying powder that I recently purchased – it looked fine at first:


But, after a swipe or two with the sponge, this was revealed:


Very lumpy, bumpy, and not my kind of powder! So, I took a knife and pried it the pan out of the compact; I wasn’t careful, because I was planning to toss the powder. However, ELF pans are very loosely attached with glue, so if you are careful, you can remove them without harming the powder – or you can do the second step (show below) first, then use heat to loosen the glue.

After the pan was removed, I was left with this:

ELF compact – no pan

Then, I took my knife again, and pried the insert out of the pan, which left me with an empty pan with just a tiny spot of glue in it:

Empty ELF Compact

And you’re done! This whole process takes less than five minutes, and you are left with a sturdy, small compact with a mirror. You can glue in a magnetic sheet to make a magnetic freestyle compact; use doubleside tape to stick in pans, or just glue in the pans. I made my mom a small compact of eyeshadows and glued in the pans with the first one I did, and haven’t used the second one yet – I’ll probably end up using double-sided tape.

Here’s the first photo again, as an example of how you can fill the compact. These pans aren’t attached, I’ve just placed them in the compact to demonstrate. Four Inglot eyeshadows fit in really nicely, leaving a little bit of space for a Wet n Wild or similarly sized eyeshadow.


——–

This post is from Project Swatch. All rights reserved.

DIY: How To Franken Your Own Jelly Nail Polish

DIY Jelly Nail Polish Franken

DIY Jelly Franken

I’ve been playing around with nail polish a lot lately, and I’ve been getting interested in frankening. Thus far, I haven’t gone so far as to buy suspension base & glitters to make my own nail polish from scratch, but I’ve been combining store-bought nail polishes to create new colors and finishes.

My most recent adventure – and most successful polish to date – was a super-easy combination of clear polish with a coral creme to make a jelly polish.  Depending on the light, the polish looks either orange or strawberry.  On my swatch wheel, I have one, two, three, four coats of my franken, the a full-strength coat of the creme I used – Revlon Delicious, from the Colorstay line.

Jelly Franken Supplies

Jelly Franken Supplies

Making this polish was super simple; I started off with a bottle of Wet n Wild clear polish, and poured out half.  Then, I added some of Revlon Delicious – I’d guess less than a quarter bottle; so the ratio was about 2/3 clear and 1/3 creme polish, though I’m not exactly sure.  I left space at the top of the bottle, so I could shake it up and mix it easily.

When I swatched it on my nail wheel, it was a bit streaky:

So, I added some nail polish thinner.  The thinner worked perfectly – leaving me with a thin, smooth, and glossy jelly polish!

Here it is on my nails – this is three coats:

You can see that it looks more orange here than in the swatch wheel photo; like I noted above, it seems to vary from more orange to more strawberry/ reddish based on the light.

Overall, I’m so thrilled with it! I love jelly finish polishes, and this is a super-cheap way to turn my cremes into jellies (and keep the cremes too, since it only uses about a quarter of the creme).

Have you tried frankening? Any notable successes or failures?

How to Press Loose Eyeshadow: Picture Tutorial

How to press loose eyeshadow - picture tutorial

Supplies!

I recently reorganized all my unused makeup/ samples, and realized that I had about 10 loose eyeshadow samples that I wasn’t using, mostly from Shiro cosmetics.  They are all excellent quality eyeshadows, but frankly, I find it too much of a pain to use loose eyeshadow most of the time.  So, I decided to press them into pans so that they would get more use.

I followed this tutorial – basically, you mix the mineral eyeshadow with a few drops of a binder (I used 100% glycerin, from the drugstore), and 91% rubbing alcohol, also from the drugstore. Then, you press it down with a coin, and let it dry.  You can buy pans from tkbtrading.com, ebay, or coastalscents.com, but I just scraped out the eyeshadow from some terrible quality eyeshadows I got as part of a 50-eyeshadow set for $5 or something like that.

cleaned eyeshadow pans

cleaned eyeshadow pans

First, take your loose eyeshadow and pile it in the pan; you can also do it in a separate container, but I think it’s easiest to just mix everything up in the pan.

This is Shiro Cosmetics  Master Sword here.

Add a blob of glycerin – about three drops

Mix it up with a toothpick. Add a little bit of 91% rubbing alcohol; this makes it easier to mix

Mix it up more

Yay, it’s nice and smooth! Now you’re done mixing.

Take a scrap of paper towel, and a coin sized to fit into your pan. Place the paper towel over the pan, and then place the coin over the paper towel, and press down. This will press out some of the moisture and make a nice, flat surface for your shadow.

Your pressed eyeshadow should look like this.

Now, let it dry for at least 24 hours, or until it is dry to the touch.

I did five eyeshadows this time!

One thing to be aware of is that pressing loose eyeshadow will change the look of the eyeshadow slightly.  I’ve swatched Shiro Shaymin, a really lovely peachy color for you below; on the left is the pressed version and on the right is the loose version. Please ignore the bits of blue on the pressed version – it got a little bit of one of the other eyeshadows on top of it when I was pressing it.  As you can see, the presssed version is a little more intense, while the loose version really needs a base.   The change in color doesn’t bother me at all, but it’s something to be aware of when pressing loose eyeshadow.

Shiro Shaymin - pressed at home vs loose

Shiro Shaymin

I’m currently storing my home-pressed eyeshadow in an ELF compact (only $1!), using stick-on magnets on the bottom of the pans.  There are six shadows because I have one shadow I pressed a couple months ago.

Have you ever pressed your own eyeshadow? Would you?